Web Widget
The fastest way to put your assistant in front of users: a chat widget on your website. Visitors click the launcher, ask a question, and your agent answers from your knowledge. Setup is one script tag.
Find it in your application: open Channels, then Widget.
Step 1: Turn It On
- Flip Enabled. This activates the widget endpoint so it accepts chat requests.
- Decide who can chat with Allow anonymous visitors:
- On: any visitor can chat. Docana creates guest users as needed. Right for public websites.
- Off: only existing Docana users with access to this application can chat. Right for internal portals.
Step 2: Lock It to Your Domains
In Allowed origins, list the sites that may embed the widget, one per line. Wildcard subdomains like *.example.com work. Leaving it empty allows any origin, which is fine for testing and a bad idea in production.
Step 3: Create an API Key
The widget authenticates every request with a Docana API key. Create one with the Widget only scope, which can only call the widget's chat, history, and archive endpoints. See Generating API Keys.
Step 4: Embed It
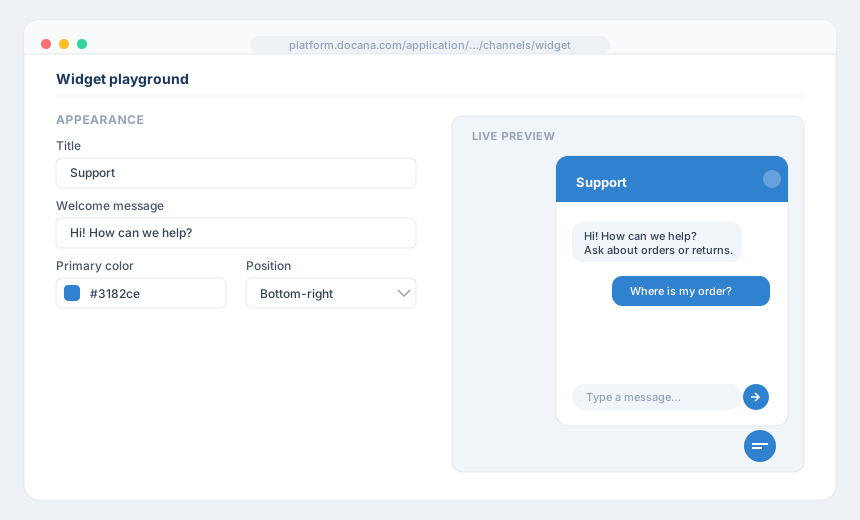
The widget settings include a playground where you customize the look (title, welcome message, color, position, launcher) and watch the embed snippet update live. Copy it and paste it into your site before the closing </body> tag:
<script src="https://platform.docana.com/widget/v1.js" defer></script>
<script>
  window.addEventListener("load", function () {
    DocanaWidget.init({
      applicationId: YOUR_APPLICATION_ID,
      apiKey: "YOUR_WIDGET_API_KEY",
      baseUrl: "https://platform.docana.com",
      title: "Support",
      welcomeMessage: "Hi! How can we help?",
      primaryColor: "#3182ce",
      position: "bottom-right"
    });
  });
</script>
That's the whole integration. Reload your site and the launcher appears.
Optional: Verify Visitor Identity
If your site has logged-in users, you can prevent impersonation. Turn on Visitor identity verification, generate the identity secret, and store it on your server. Never put it in client-side code.
Your server signs each visitor's ID with HMAC SHA-256 using the secret, and you pass the result to the widget:
DocanaWidget.init({
// ...
visitor: {
id: "user-123",
name: "Alice",
hash: "HMAC_SHA256_HASH_FROM_YOUR_SERVER"
}
});
With verification on, Docana rejects any visitor whose hash doesn't match. Without the secret, nobody can pretend to be Alice.
Other Settings
- Agent routing: send widget conversations to a specific agent, or let the application's default assistant handle everything
- Attachments: let visitors send files and paste images from the clipboard
- Voice and language: pick the voice for spoken replies and bias the response language
- Sounds: toggle notification sounds for open, send, and receive
Calling the API Directly
The widget is a UI over a plain HTTP endpoint. If you'd rather build your own chat interface, call the endpoint from your backend with the same API key. The widget settings page shows a ready-to-run curl example, and the API Overview covers the details.
Next Steps
- Creating an Agent - Control how the widget answers
- Conversation Insights - Learn what visitors actually ask
- WhatsApp - Meet customers off your website too